

.png)


.png)


.png)
SailZoo Blog
How to set up the mast on your sailboat
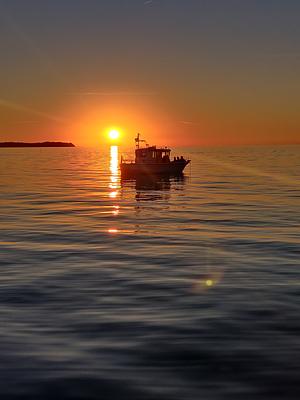
With the sun higher in the sky and the days getting longer, it's time to get your boat ready for the sailing season. One of the most important tasks is setting up the mast - a process that requires care and preparation. In this guide, we take you through the essential steps on how to properly prepare and set up the mast of your sailboat. Disclaimer: If you, dear reader, sail a motorboat, I admit that this article will be boring and irrelevant - sorry in advance. We'll get after it!
.jpg)
Inspect the rig well before the mast is attached.
The rig is exposed to a lot during its lifetime. Many violent jerks, constant vibrations and not least salt water that penetrates everywhere.
When the mast is down for the winter, the rig should be carefully inspected. Many damages can be found during a thorough inspection. It can be very expensive if the rig breaks down because it has not been properly inspected and maintained.
Prepare well in advance with an inspection of the standing and running rigging. With an inspection, you can discover in time that something needs to be replaced so you don't only discover it on the day the mast is attached. It's also during mast attachment and removal that most rig damage occurs, so it's a good idea to be diligent with your inspection and planning.
In the worst case scenario, breaking the mast in rough weather can be fatal for both crew and boat.
During a visual inspection, pay special attention to the following points: corrosion, corrosion, metal fatigue and cracks.
Pay special attention to the wire terminals and areas where there is stainless steel on aluminum. This is typically where corrosion occurs first.

Check your wires for lice. If there are lice in the wires, you are advised to change these wires. Lice are small metal threads that protrude from the wire and can be hard to spot with the naked eye. A trick here is to use some cotton wool and run it up the wire. If there is a louse, the cotton wool will stick to the wire.
It's also a good idea to lubricate your rigging screws with grease before the sailing season so you can adjust your rigging screws more easily.
Furthermore, you should also check your sailing horns. Check the fittings and protection on the outside of your sailing horns so that it doesn't result in your sails wearing out while sailing.
Also make sure to check your cables and connectors in the mast for lanterns, antennas, anemometers, etc.
Tip: It is a good idea to remove the windex when the mast is removed as it is often damaged during transportation and storage. Remember to reinstall it when the mast is ready to be lifted.
It is often the case that the windex is damaged when attaching the mast. Pay attention to this so that there is no need for a man in the mast or for the mast to be removed again.
During the winter, it's a good idea to take halyards, sheets and ropes out of the mast and wash them off with salt water. Add a little fabric softener to the water to soften the sheets and halyards. If yours are very dirty, put them in a large laundry bag and put them in the washing machine.
With age, wear and tear occurs due to the use of the ropes and the effects of sunlight and salt water on the running rigging. Therefore, you should check and replace your boat's ropes regularly to avoid unpleasant surprises during the season.
If you don't feel confident inspecting the rig yourself consult a rigger for advice.
Book a crane truck well in advance
At some ports you can use the port's crane and lifting facilities, but in most cases you have to book a boat transportation to launch the boat and lift the mast on the boat. Talk to some of the other boat owners in the harbor where you're moored and book a crane truck well in advance. That way you can get your boat in the water at the time you have planned and not only when a crane truck is available. It also makes it easier to attach the mast when there are more hands to help. The same applies if the port has its own crane facilities.
Guide to setting up a mast:
Whether you use a crane truck or the port's mast crane, the same principles apply to mast installation.
The safe lift
Be careful when lifting the mast! If you lift it straight in the middle, it can easily tip. So remember, the lifting strap should sit about a meter above the center point to keep the mast stable with the weight at the bottom.
A clever solution is to use a round sling - it's a clever lifting strap that forms a loop. Tie a rope to it and attach it under the boom bracket so it takes the weight when you lift. But be aware that because the lifting strap sits above the sling horns, someone will have to climb the mast afterwards to get the strap free.
Lifting by the sallingshorns
For smaller masts with one set of sallingshorns, you can place the lifting strap just below them. Tie a rope to the strap so you can easily pull it free once the mast is in place. If you're unsure if the mast can take the strain, use the downhaul rope and attach it to the boom bracket for extra security. Just remember, if there isn't a strong person holding the bottom of the mast, it can tip.
The good news? With this method, you don't need to send someone up the mast to remove the strap.
Depending on the type of mast, there are different methods and techniques for lifting. Before you plan to lift the mast, you should consult your boat's manual for specific instructions on where to place the mast. There may also be a marking on the mast indicating where the lift should be made.
Danish Sailing Union has written a very good and precise article, which we like ourselves, about safe mast crane use. You can read it here. A short step-by-step excerpt is available here:
Step-by-step:
- It's optimal to have a minimum of three people: one to operate the crane, one to guide and hold the bottom of the mast, and one to attach the stays and top shrouds.
- Once everything is prepared, the crane operator quietly lifts the mast up. Whoever is responsible for holding the bottom of the mast controls the mast from this position.
- Once the mast is raised and more or less vertical, the crane operator slowly turns it over the boat and lowers the mast into place in the mast base.
- It's now up to the third person to attach the top mitts and braces.
- Once they are secured and tensioned by hand, the crane can be slackened and released from the mast. It is not necessary to tension the mast hard at this stage.
The roll bar? It can shift the balance. So make sure it's tightened well to the mast so it doesn't mess with your balance while lifting.
Once that's done, all that's left is to trim the rig - and that's a whole science in itself!
But here's a short thumb guide on how to trim the rig yourself without getting into trouble if you have a wire rig:
Rig trim for sailboat
The 3 most common materials the standing rigging most often consists of are:
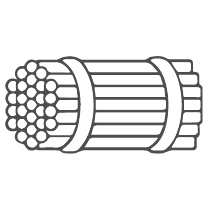
- Wire rig: Twisted metal wires assembled into a terminal - most common rig on most common boats
- Rod rig: Solid metal rods.
- Dyneema rig: Simply put, a type of rope made from a type of ultra-high-molecular-weight polyethylene (UHMWPE) fiber. Very strong and significantly lighter than, for example, rod-rig and wire-rig.
Static alignment in port:
Before heading out to sea, start by static tuning your rig while the boat is in port. This involves making sure your entire standing rigging is loose enough for adjustment, the mast is vertical and centered, and the rigging screws are tightened evenly from top to bottom by hand. The aim is to achieve a stable and straight mast with no lateral tilt, ready for fine-tuning.
- Make sure all wire/standing rigging is "hand slack", like a blunt guitar string - the mast stays standing regardless :)
- Make sure the mast is vertical and not leaning to one side or the other.
A little tip to make sure the mast is centered is to attach a long tape measure to a sled in the mast and use a halyard to run it to the top of the mast. This ensures you measure accurately from the center of the mast. Then measure the distance from the starboard tiller and compare it to the port tiller. The way you adjust the sideways tilt of the mast is actually the lower shrouds (lower shrouds), NOT the top shrouds. - When the mast is straight, it's time to tension the rig. You start from the top and work your way down towards the bottom. At first, it's enough to tighten the turnbuckles by hand as much as you can from top to bottom.
- When it's tight enough to stop the mast from dangling, it's time to mount the boom, and then tighten all the turnbuckles exactly the same number of turns per turnbuckle. So if you now tighten 2 full turns on the starboard top rigging screw, you must also tighten exactly 2 turns on the port rigging screw.
- Continuously check that the mast remains in balance while tensioning: A tip for this is to simply look along the mast up through the sail track all the way to the top. If there is any imbalance, you will quickly see a small curve sideways in the sled track. This is corrected by either tightening the opposite turnbuckle or loosening the turnbuckle to the side that the mast is bending.
- When all the shrouds are tensioned OK and the mast doesn't bend sideways, the mast is finished in the harbor. It doesn't need to be tensioned very tight at this stage. That comes at the next step: Dynamic tuning.
2. Dynamic tuning of the rig:
After the rig is statically tuned, the next step is a dynamic rig tuning. You do this by sailing out on a day when there is a true wind of around 6-7 meters per second, preferably without big waves, and where you can cross upwind when sailing.
- You start by sailing crosswise against the wind and then tighten the turnbuckles on the leeward side first (remember to count precise turns!)
- Then cross on the opposite neck and fasten the mittens on the "new" leeward side, exactly the same way you fastened the mittens on the opposite side.
- Continue this process until there are no more mittens "slacking" or "hanging" on the leeward side.
- You are now - roughly speaking - done with tuning the rig. This can be refined much more depending on the type of boat and your preferred type of sailing. If necessary, mark the rigging screws with tape where you have tightened the rig, so you can tighten them again the next time you mount the mast.
Is it your first time putting up the mast? And do you need an experienced hand? Don't hesitate to call for a rigger. It can save you both time and money in the long run.
A few tips at the end:
A few tips at the end:
- Check your sallingshorns: They should NEVER bend downwards when the mast is on the boat and the rigging is tensioned. This is a sign of improper installation and a risk that the mast could break or fall over in a short time if you sail out in rough weather. A rule of thumb when you're looking up the mast after installation is that the (rear-facing) sailing horns should point slightly upwards or at least be mounted at a right angle to the mast. Downward-facing grommets are a No Go!
- Mast bend: When the mast is mounted on the boat and the rig is tensioned, the mast must NEVER bend backwards/aft, seen from the side. A mast (on modern boats) often has a small amount of pre-bend, but this is always with the "belly" towards the bow and NOT aft. No mast is designed for this. Masts that curve "backwards" in the middle are a No Go.
- Seldén, the manufacturer of the vast majority of modern masts on sailboats in Danish ports, also has a good guide to their masts. You can read it here.
Written by Mads SailZoo day 14. March 2024

Sign up for newsletter
Stay tuned for new sailing articles, sailing industry news and early access to new features.
Also see
.jpeg)
.jpg)